This is my first post and I can say I am quite nervous because this is the first time that I am trying to create a tutorial. On the other hand I am very excited too! So let's begin!
In this post I will demonstrate how to create localized applications. In other words, I want to create an application that will be available to more than one language. The information will be displayed to the user according to the locale configuration of his device.
As we know each Android Project has a res/ directory in which the resources of our application are stored. The res/ directory includes the folders drawable-ldpi, drawble-mdpi, drawable-hdpi, layout and values. Inside the drawable folders we store images needed by our application, in the layout folder we store the xml files that contain the descriptions of our application's layouts and in the values we store a number of strings.
These folders inside the res/ directory contain the default resources of our application. Default resources are vital for our application because when it runs in a locale for which we have not provided locale-specific information, Android will load the default values from these folders. If these default files are absent, or if they are missing something that our application needs, then our application will not run and will show an error.
So what now if we want to create an application that must be available in English, Greek and Italian for example? In this case we need to create alternative resources for each language. We need to create an extra folder inside the res/ directory for every resource that we want to be available in all the languages we wish to support. Let's say that we want to display a different flag for every language and a piece of text written in the corresponding language each time. So we need to create a drawable folder for every flag and a values folder for every text respectively.
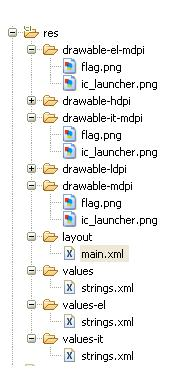
The image below shows the folders we need to create:
 In folders drawable-mdpi and values we store the default resources (for the English language) and in the rest the resources for Greek and Italian. For every other language we create a folder with the same name as the folder for the default values followed by a two-letter ISO-639-1 language code representing the country (i.e values-it).
Each flag file inside the drawable folders represents the flag for each country. Also, in each strings.xml file we have defined a string with the name locale_text containing a piece of text in the corresponding language as shown below:


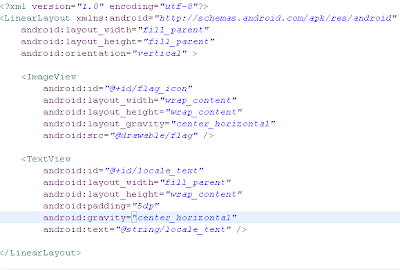
Now let's create the layout. All we need is an ImageView for the flag and a TextView for the text. Below is presented the layout in the main.xml file:
In this post I will demonstrate how to create localized applications. In other words, I want to create an application that will be available to more than one language. The information will be displayed to the user according to the locale configuration of his device.
As we know each Android Project has a res/ directory in which the resources of our application are stored. The res/ directory includes the folders drawable-ldpi, drawble-mdpi, drawable-hdpi, layout and values. Inside the drawable folders we store images needed by our application, in the layout folder we store the xml files that contain the descriptions of our application's layouts and in the values we store a number of strings.
These folders inside the res/ directory contain the default resources of our application. Default resources are vital for our application because when it runs in a locale for which we have not provided locale-specific information, Android will load the default values from these folders. If these default files are absent, or if they are missing something that our application needs, then our application will not run and will show an error.
So what now if we want to create an application that must be available in English, Greek and Italian for example? In this case we need to create alternative resources for each language. We need to create an extra folder inside the res/ directory for every resource that we want to be available in all the languages we wish to support. Let's say that we want to display a different flag for every language and a piece of text written in the corresponding language each time. So we need to create a drawable folder for every flag and a values folder for every text respectively.
The image below shows the folders we need to create:
Each flag file inside the drawable folders represents the flag for each country. Also, in each strings.xml file we have defined a string with the name locale_text containing a piece of text in the corresponding language as shown below:
English
Greek
Italian
Now let's create the layout. All we need is an ImageView for the flag and a TextView for the text. Below is presented the layout in the main.xml file:

- If the device is set to any language other than English, Android will load
locale_textfrom theres/values/strings.xmlfile and flag from res/drawable-mdpi folder - If the device is set to Greek, Android will load
locale_textfrom theres/values-el/strings.xmlfile and flag from res/drawable-el-mdpi folder - If the device is set to Italian Android will load
locale_textfrom theres/values-it/strings.xmlfile and flag from res/drawable-it-mdpi folder
package com.androidsnipet.localization;So if we upload the project to the Android Emulator with English settings we will see the UK flag with the English text as shown below:
import android.app.Activity;
import android.os.Bundle;
public class AndroidLocalizationActivity extends Activity {
/** Called when the activity is first created. */
@Override
public void onCreate(Bundle savedInstanceState) {
super.onCreate(savedInstanceState);
setContentView(R.layout.main);
}
}

If we then change the settings to Italian we will see the Italian flag with the Italian text as shown below:

That's it! Find the whole project here! So here ends the first tutorial! Leave a comment about what you did or didn't like in order to help me create better tutorials in the future!
Cheers!
Cheers!


